Core concepts
Settings
Settings are split into Basic Settings and Advanced Settings. To get started with Bizman you only need to focus on the Basic Settings.
Basic Settings
Basic Settings cover 3 main areas, Waste, Labour, Markup. These fundementally affect your costing.
Location: System Admin -> Basic Settings
You will notice checkboxes for each setting, these are simply there for you to check off settings as you finish them. Bizman will keep reminding you to setup your software until these are all checked.
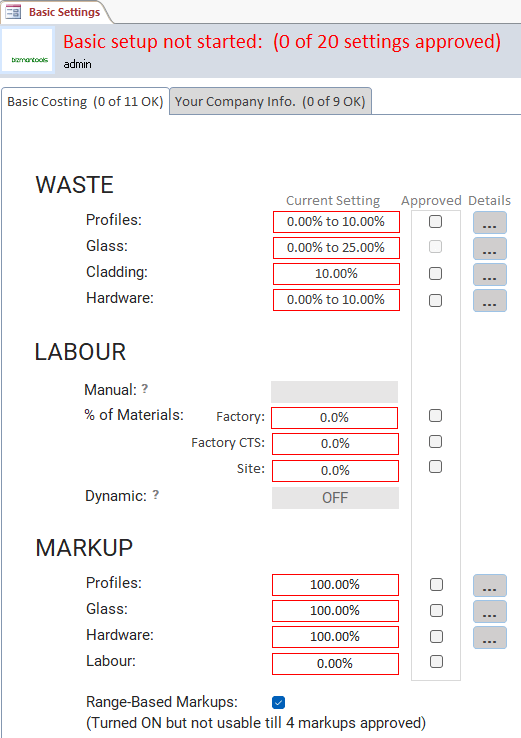
Waste
Waste percentage represents the proportion of material that is not utilized in the final product and is discarded during the production process. This factor is crucial for accurately determining both the cost implications and the quantity of materials necessary for purchase.
To accurately account for waste, it's essential to understand that waste is not an additional amount to be added to your required materials. Instead, it should be considered in reverse: calculate the total amount to purchase by adjusting for waste, ensuring you have enough material to meet your requirements without surplus.
For example, if a project requires 90 units of material and the estimated waste is 10%, you should calculate the total amount to purchase as follows:
To find the total amount needed, including waste, divide the required amount by (1 - waste percentage). In this case, 90 / (1 − 0.10) = 100 units.
Thus, you will purchase 100 units to ensure that, after accounting for 10% waste, you have the 90 units needed for the project.
This method ensures you efficiently manage resources and costs by purchasing the correct amount of material, taking waste into account.
Labour
he cost structure within Bizman is composed of two primary elements: Material Cost and Waste Cost. The Material Cost is automatically calculated by Bizman based on the inputs provided in the drawing screen, which includes details from your KITS and any Additional Settings. This leaves Labour Cost as the other significant component to consider.
Bizman provides three distinct methods for calculating Labour Cost:
Manual Calculation: This method allows for direct input of the labour cost for a specific item. You simply enter the desired amount you wish to charge for labour on a particular line item.
Percentage of Material Cost: With this approach, the labour cost is determined as a percentage of the material cost. For example, if the material cost for an item is R100,000 and you set the labour percentage to 30%, the labour charge would be R30,000.
Dynamic Calculation: This method employs a more complex calculation that takes into account the estimated duration of the job, based on your specific product operations (which requires initial setup) and labour efficiency metrics. By integrating your overhead recovery rate per man-hour, Bizman dynamically computes the effective labour cost required to manufacture the item.
These methods offer flexibility in how you allocate and recover labour costs, enabling precise and tailored cost estimation for your projects.
Markup
Markup is a simple yet powerful concept used in Bizman; it represents the percentage by which you choose to increase your costs to determine your selling price. This allows for differentiated pricing strategies across various categories, such as Profiles, Glass, Hardware, and even Labour Costs. With Bizman, you have the flexibility to apply distinct markups under each of these categories.
Moreover, Bizman enables you to refine your markup strategy further by applying different markups within material categories, referred to as RANGES. This means you can assign specific markup values to different product types within the same category—for instance, applying a different markup to casement windows compared to shopfronts. This level of granularity ensures that you can tailor your pricing strategy to match the value and cost structure of each product, optimizing profitability while remaining competitive in the market.
Your Company Info
This is where you set all your company specific information, such as Name, Logo, Address, Terms and Conditions etc.
Location: System Admin -> Basic Settings -> Company Info
Company Details
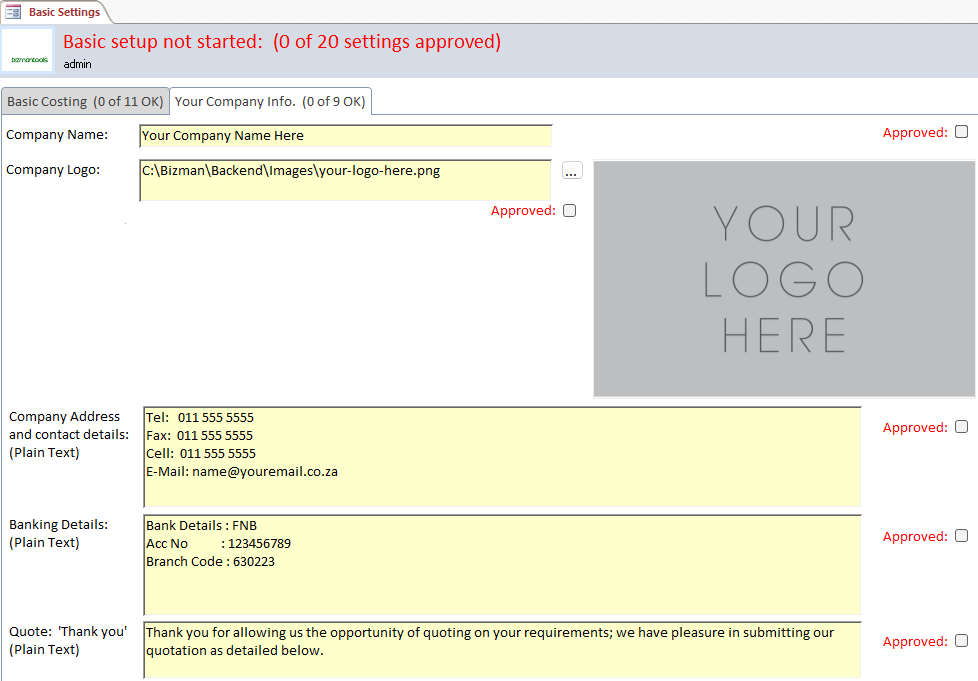
input your company's specific details. Here's a step-by-step guide to customizing this information:
- Company Name: Click on the text field labeled "Your Company Name Here" and type in the official name of your business.
Company Logo: To update the logo, click on the path (C:\Bizman\Backend\Images\your-logo-here.png) or the '...' button to browse and select your company's logo file from your computer. Ensure the image is of high quality and represents your brand.
Company Address and Contact Details: In the provided plain text area, enter your company's physical address and contact information, including telephone, fax, cell, and email addresses. This information will appear on your quotations and other official documents.
Banking Details: Enter your bank's name, your account number, and branch code. This information is crucial for clients to make payments and should be accurate and up-to-date.
Quote 'Thank you' (Plain Text): Customize the thank you message that will accompany your quotations. This text can be personalized to reflect your company's voice and message to the customer.
After filling out these details, you must approve each section by checking the 'Approved' box next to each category. This action verifies that the information is correct and ready to be used in your official documents and quotations.
Once all the necessary fields have been completed and approved, you will have set the basic foundation for your company's identity within Bizman, ensuring all documents generated reflect your business accurately.
Email Defaults

This section of the Bizman application setup is where you configure the default subject header and body text for emails that include quotations sent to clients. Follow these steps to personalize your email communications:
Quote Email Subject: Click on the field labeled "Enter standard email subject header here" and input a subject line that will be used by default when emailing quotes to clients. Choose a subject that is clear and reflects the content of the email, such as "Your Requested Quotation from [Your Company Name]".
Quote Email Text: This is the body text that will accompany your emailed quotations. Click on the rich text area where it says "We have pleasure submitting the attached quotation in respect of your valued enquiry referenced above. Please contact YourName on 082 555 5555." Replace the placeholder text with your personalized message and contact information. This message should be professional and courteous, providing the recipient with the necessary details about the quotation and how they can get in touch with you for further discussion.
Make sure to replace "YourName" with the actual name of the contact person within your company who handles client inquiries and quotations. Update the phone number to the correct contact number for your business.
After customizing the email subject and body text, check the 'Approved' box to confirm that the information is accurate and ready for use. This step ensures that all quotation emails sent from Bizman will have a consistent and professional appearance, aligning with your company's branding and communication style.
Terms and Conditions
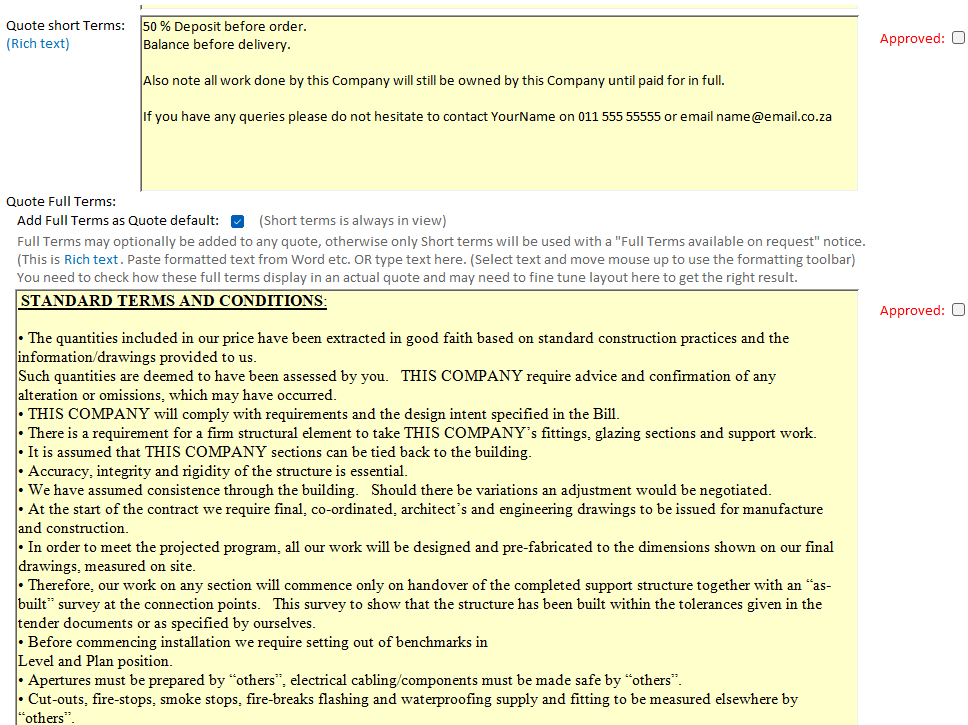
This section of the Bizman setup allows you to define the terms and conditions that will appear on your quotes, as well as the short terms that summarize the key points. Here’s how to customize these settings:
Quote Short Terms: In the rich text field, edit the placeholder text to reflect your company's specific short terms. This typically includes essential payment information such as deposit and balance requirements, ownership details, and a prompt for the customer to reach out if they have questions. Ensure you replace "YourName" with the appropriate contact person's name and provide the correct phone number and email address for customer inquiries.
Quote Full Terms: The checkbox "Add Full Terms as Quote default" allows you to decide whether the full terms will be included in every quote by default. If you choose to have full terms on display, you need to ensure that the rich text below is thoroughly reviewed and edited to suit your company's policies and legal requirements. The text provided lists out detailed terms regarding quantities, compliance with requirements, structural elements, and various other standards and conditions. Review each point carefully, ensuring they align with your business practices.
If you make any changes, you can use the rich text formatting toolbar to adjust the text style and layout. After finalizing the full terms, it's important to check how they will appear in an actual quote to ensure proper formatting and clarity. Once you have entered and formatted both the short and full terms, check the 'Approved' box to confirm that the information is correct. This will finalize the terms and conditions that your company will use in its quoting process, ensuring that all quotes sent to clients are consistent and legally sound.